
Resonator Guitar Parts 101
Resonator Guitar Parts 101
A bit of a primer on the pieces of these resonator guitars. If you are new to the world of resonators, this will help you get acquainted.
The body of a resonator guitar is typically either steel or brass. My guitars are no different. German silver is also used but is much more rare. It's hard to find in a wide enough piece for guitars as its made for wind instruments. This doesn't make it better, it's like chocolate or vanilla ice cream- it's just different. I heard a rumor that in the early days german silver sheets were actually easier to find than steel sheets.
Steel is a bit louder and has more attack, brass is warmer in sound and smoother. The difference between the material is definitely noticeable but they are not worlds away from either. I have some sample videos on the "Hear a Mule" page so you can see for yourself. Because these guitars are made from metal they are heavier than normal acoustic guitars. This is unavoidable. Picking the thickness of steel is not a race to 'lightest'. Eventually you get to a spot where it stops ringing as it should. Think of the difference between hitting a xylophone key and an aluminum can. Using a strap even while seated can help keep things more comfortable.
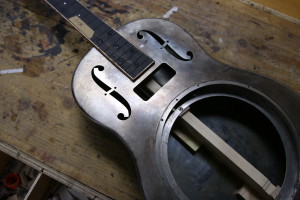
Look at the picture above. The large open circle in the middle is comprised of three thicker pieces of metal soldered together called the sound well. Inside the sound well is where the cone(s) are seated. This area is flat so that the pressure on the cones is even all the way around so that it vibrates as well as it can. The depth of the soundwell is also a factor in determining the height of the saddle, along with the neck pitch. This relationship between the neck angle, sound well depth and saddle height affects the tone of the resonator guitar a great deal. This is because it affects how much pressure is put on the cone. Too little and it's quiet and nondescript, too much and it's tinny and thin because it's squeezing the cone too much.
Underneath the sound well is the neck tenon. The tenon is the backbone of the guitar. This is glued into a mortise in the neck heel and also attached to the body of the guitar. It forms a 'spine' of sorts that takes the pressure of the strings and lets the body vibrate. The sound producing element of the guitar, the body, is free to do its thing while the neck holds down the fort.
Underneath the neck tenon are wedges that are fit between the tenon and the back. This adds in support of the back of the guitar and it also allows me to tune the back slightly. If it's too warm and bassy I can tighten the wedge much like a drummer would tighten a drum head.
The other hole in the top is for a p90 pickup which is an option. I think the best way to replicate acoustic sound is with a mic, and in situations where you need more RAWK the best way to do that is with a genuine electric guitar pickup. Having this cavity in the top allows me to do that.
You cant see it but inside the body underneath the fingerboard extension there is a wedge that is fit between the neck tenon and the top of the guitar. I put screws through the fingerboard into this wedge and that helps attach the neck to the body. I cover these screws with ebony plugs to keep things simple looking.
Other than the neck tenon neck construction is the same as a standard acoustic guitar. I use a 12 fret neck joint, with a cutaway as an option if necessary.
Then there is the cone. I've written previously on my quest to spin my own cones. There is no voodoo here- 3031 aluminum, .010 thick. Spun, not stamped. They break in pretty quick. There is a noticeable improvement in the first week or so after its strung up.


nike air jordan 12 homme lumineux noirblanc veste air jordan france en ligneair jordan 1 game royal where to purchasezapatillas nike air max command running talle 43 5 11 5 us9 reasons tonot to buy nike air max tailwind 8 november 2018 runrepeat
nike vandal high supreme vintage shoes blue red [url=http://www.dayinbelgrade.com/en-ligne/nike-vandal-high-supreme-vintage-shoes-blue-red]nike vandal high supreme vintage shoes blue red[/url]
2017 air jordan 9 white tour yellow concord for salenike classic cortez nylon womens shoes white redcheap kevin durant cheap nike zoom kd trey 5 gold black blue pinkcheap air jordan 2s white blue black
nike zoom pg 1 pacers pe 2019 copuon [url=http://www.worldchampionshipbowhunt.com/brands/nike-zoom-pg-1-pacers-pe-2019-copuon]nike zoom pg 1 pacers pe 2019 copuon[/url]